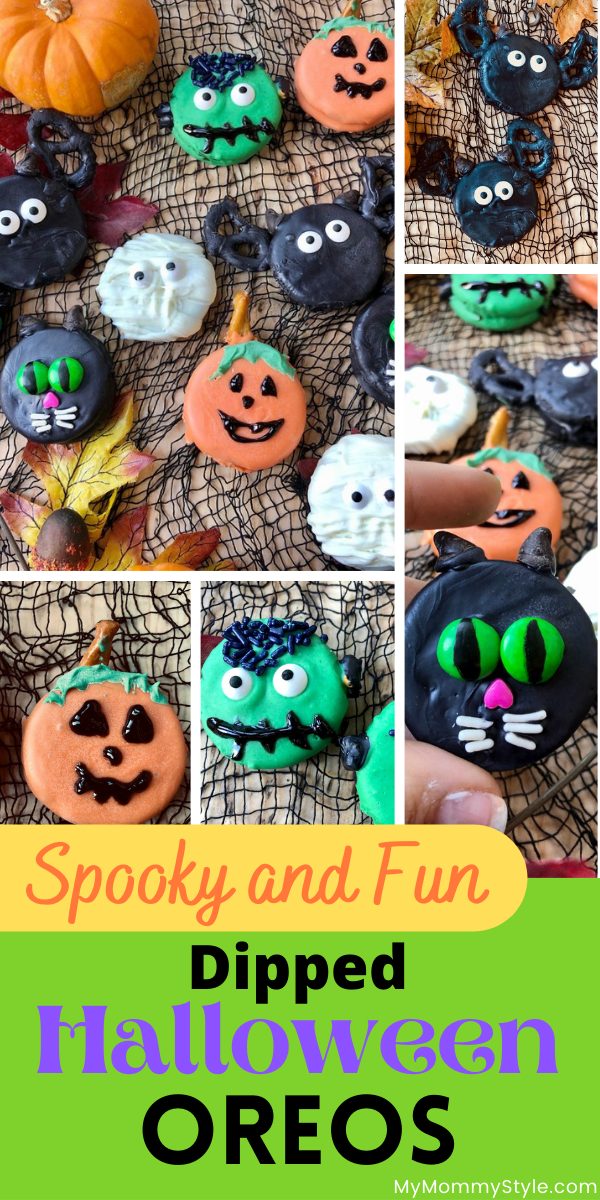
These Halloween Oreos are dipped in chocolate and easy to make. Add some bats, cats, Frankenstein, pumpkins and ghosts to your next spooky party.
.jpeg)
Halloween Dipped Oreos
As Halloween approaches quickly, I wanted to share these Halloween Oreos with you all for the perfect treat and center piece of your next party. I love oreos on their own, but what’s even better about these are they get fully dipped in chocolate!
Jump to RecipeBats, black cats, Frankenstein, pumpkins and ghosts are created with minimal effort and look like you spent hours making them. I love to serve these Halloween Oreos with some Halloween appetizers and Halloween Drinks.
How to Make Dipped Oreos:
To make dipped Oreos you just need: Oreos, candy melts and toppings to create all of the different Halloween characters. It really doesn’t matter what kinds of Oreos you use, vanilla, chocolate, peanut butter or mint. Single stuffed or double stuffed, the choice is yours. Any variety will do.
Black Cat Halloween Oreos
- Oreos
- Black candy melts for dipping the oreo
- M&M’s for the eyes
- Edible black marker to draw the eyes
- Chocolate chips for ears
- Heart shape sprinkle for nose
- White sprinkles for whiskers
.jpeg)
Bat Halloween Oreos:
- Oreos
- Black candy melts
- Mini pretzels broken into 2/3 to create wings
- Eye candy
- Chocolate chips for ears.
- Dip pretzel separately and wait until almost dry to attach to body of the bat.
- Attach by dipping the corner of the pretzel into the melted candy. Prop on a plate so the wing is supported as it dries.
.jpeg)
Pumpkin Halloween Oreos
- Oreos
- Orange candy melts
- Gel cookie decorating to dray the face
- Large twisted pretzel for stem
- Green candy melt for the stem
.jpeg)
Ghosts Halloween Oreo
- Oreos
- White candy melts
- Candy Eyes
.jpeg)
Frankenstein Halloween Oreos
- Oreos
- White candy melts
- Green food coloring
- Candy eyes
- Black decorating gel
- Large twisty pretzels dipped in black candy melt
- Dark sprinkles for hair
.jpeg)
Common Asked Questions:
- Why do you use candy melts and not chocolate chips? This recipe uses candy melts because they’re much easier to work with than chocolate chips. Candy melts create a smooth and thin coating. Chocolate chips usually creates a thicker and dull shell. Also chocolate chips won’t smooth out the same way as the candy melts.
- What is the easiest way to melt your candy melts in the microwave?Place the candy melts in a microwave safe bowl and cook for 30 second increments at 50% power. Stir occasionally until the candy is melted. Melting without stirring can cause the candy to burn so be sure to give it a stir every 30 seconds.
- What to do if your melted candy melts are too thick? If your melted candy melts seem thick, you can add 1/2 tsp of vegetable oil. The added oil will help you reach a consistency where the chocolate will give you a slow and steady stream off the spoon. It needs to be thin enough so it can smooth out on the top.
Tips and Tricks for Halloween Oreos:
- Spend a little extra money and use the Ghirardelli Melting Wafers. The quality is superb and it will give you the best results. The wafers melt easily, so easy to work with and they taste the closest to real chocolate.
- Be sure to tap and scrape all the excess chocolate off the bottom of your Oreos before they dry. This will prevent the chocolate from pooling at the bottom of your cookie. Extra chocolate is always a treat, but it can distort the shape you are going for in your Halloween Oreos.
- If your chocolate starts to cool and thicken up while your dipping, just return the bowl to the microwave and heat for another 10-15 seconds.
- Make them ahead! Halloween Oreos can be stored for up to 2 weeks in an airtight container. I probably wouldn’t make them more than a week in advance.
.jpeg)
Here’s the Recipe for Halloween Oreos:
.jpeg)
Spooky and Fun Halloween Oreos
Ingredients
- 1 bag oreos
- 1 cup candy melts black, orange, white
- ½ tsp vegetable oil optional
Instructions
- Heat candy melts at 50% power for 30 second intervals stirring in between.
- Add 1/2 tsp vegetable oil per cup of candy melts to get the right consistency.
- Dip Oreos one at a time, covering all sides.
.jpeg)
- Use a fork to scoop it out of the chocolate and tap on the side of the bowl to get off the excess. Tap until it creates a smooth finish.
.jpeg)
- Spray cooking rack with non-/stick cooking spray for easy removal.
- Allow to cool 2-3 minutes before attaching decorations to the cookies. Use fork or tooth pick to adjust placement if you need to.
Notes
*Posts may contain affiliate links. If you purchase a product through an affiliate link your cost will be the same, but My Mommy Style will receive a small commission. Your support is greatly appreciated!
You May Also Like:
.jpg)
.jpg)
.jpg)
.jpg)